Thursday, February 17, 2011

Mammary Foam

a.k.a. The Draw Bed Part Trois

Oh the joy! Simple solutions yielding big results. If you recall from earlier posts, we simplified the bed plans and created the Draw-Bed. A wonderful solution, but still it needed a mattress...


After much internet research, I opted to undermine the U.S. economy and screw my fellow American worker out of a job by ordering our bed from Walmart. Normally not a fan of the Donate-To-China store on principle, one of my internet searches popped their line of memory foam mattresses onto the screen and it crushed the rest of the competition. It was 5 times cheaper than the 2nd leading competitor, was made of more memory foam, AND with their Ship-Free-To-Store policy, there were no shipping charges associated with my 75 lb order. Let me say that again, FIVE TIMES CHEAPER. I couldn't resist. Sorry America. I try, I really do. But to pass on a full size memory foam mattress for $130 is just stupid. The reviews were high for this product too.

It took a week. We tracked it everyday online. (we were a little excited) We picked it up at our not-so-local Walmart Supercenter, which actually isn't bad compared to most Walmarts. It's a cut above the average. The best Walmart I've ever seen was in Fargo, North Dakota. Freaking unreal in there. I felt like I was in a gourmet grocery store the place was so swanked out. What was I doing in North Dakota? Good question, but a story for another time.

It came in a box. A very non-bed-mattress shaped box. We opened the box and our bed was folded in half, rolled into a burrito, and stuffed in a sack.
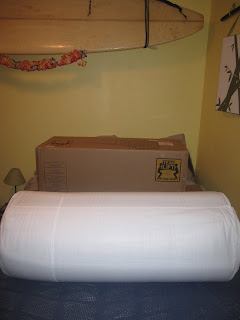

It took us forever to get the canvas bag off the mattress. I think they vacuum-pack the mattress, which is foam (obviously) so when it greets the air it swells to gigantic proportions, making it very difficult to remove from a tiny little sack.


Success! Salvaged the bag too!


Yay! Look a new mattress and a new bag! Man our fingers hurt from prying that thing off!


The mattress smelled like the polyurethane blast furnace, so we let it air out and rise for a couple days. This is what it looked like immediately after box removal.


And this is what it looked like the day after. Not much evidence in the photos, so I stopped taking stop-motion of them. It was kind of like watching paint dry, and similarly the changes were noticeable to the human eye, but not to the camera. It took a few days for the mattress to off-gas the stinky polyurethane smell away.

Look, a bed on a bed!


So the next task was to cut the foam. Our plan is for the mattress to be comprised of two halves that fold into a couch by day and open into a bed by night. Or the opposite way if we become vampires.

Best advice I read online said to use an electric carving knife, and it just so happens Brie and I know someone who owns one, so we borrowed it for the task. The task took me the better part of an hour.

I laid the mattress out on the floor, unzipped it out of its protective cover, and drew my carving lines. Our dimensions call for a mattress that is 6" less wide than a full size mattress, with the length remaining the same as a full. Easy enough. I chose to cut out a strip down the center. I can't remember why now, but I had a good reason at the time. I think.

I drew the lines...


And made the cuts...


And removed the unwanted middle piece.


Overall, I didn't do too badly. I think this was the right tool for the job. The teeth of the carving knife weren't sharp enough to cut through the foam like butter, but if I man-handled the foam a little, the knife met no resistance and just did what it was supposed to do. There was very little foam wasted in the process. Here are a few images from the fallout.


Could have been worse. Thanks for the tool loan, Jes!

When Brie came home from the art studio, we laid around (layed around? leied around?) on the mattress pieces inside the house and then got too excited and hauled them out to Bessie for the official fitting.

They fit well. In the photo below, Brie is checking her phone for the current temperature and cursing at it because it's clearly saying its warmer than it is (36 F was the forecast. It's waaaay chillier than that. Prob more like 28. There was ice forming outside!).

Look at the monkey's little gorilla feet!


So yeah, I guess we need to install the heater. Anyway, moving on, the mattress is so comfortable we both find ourselves just hanging out on the memory foam. When you get on the mattress, it just swallows you. But it doesn't move. It sort of incorporates you into itself, molding ergonomically around the curves of your hips, spine, and shoulders. I don't know how we're going to get out of bed. It's like quicksand without the suffocation. I love this mattress. It might be more comfortable than the one we sleep on. Significantly cheaper and perhaps better for our backs? Time will tell if it will hold up to multiple night's sleep. More on that in the future.


I can't believe how much room there is on this bed. Like I said, it's 6" less wide (6" unwider?) than a full size mattress, but we don't even notice. Plenty of room for feet, plenty of headroom, we can even put our arms behind out heads without crowding each other, and we're not smaller than average people. I'm 5'9", and Brie is 5'7" so we're not overly large but still, look how tiny I look in there! That's 180 lbs of brawn relaxing on the bed! Plenty of room to spare!


My feet were a little cold in the chilly weather by this point. Where did I put my shoes?


The Draw-Bed also folds into a couch, as seen below. Brie's hanging out, propping her arm on the invisible future pillow. Cute profile.


And look how deep the couch is! Plenty of room to spare. Where is Brie?


Probably a three person couch if necessary.


My turn. I'm reading my invisible future book. Perhaps it's by H.P. Lovecraft? Perhaps it's about witches of old who simply had a firmer grasp upon physics than the rest of the population?


Where did I put my invisible future potential remote?


Found it. I'm now watching the invisible future 3D holographic projector (why not?) with my arm propped on the invisible future pillow.


And now instead of watching Princess Leia's hologram beg us for help again, I'm staring at the beautiful sanding job Brie performed on the mahogany ceiling.


Who's making all the racket out there? Don't make me come outta mah traylah!


And that's all folks! The mattress is cut and permanently installed inside Bessie. Once poor Brie gets a moment's rest from her dissertation, she'll cut the fabric for the Draw-Bed, sew the seams, and that will be the last of the Draw-Bed. Well, maybe we'll get sheets. Or maybe we'll just use our sleeping bags.

Stay tuned for the upcoming colors and soon-to-be-visible pillows!

Tuesday, February 15, 2011

Booth Elevation

So many little projects get swallowed by the larger more glamorous ones that I just have to share this quickie. Remember, there are no small parts, only small actors. I was told that in high school and I still don't think it's right. It's supposed to tell you not to get down on yourself because your part is not the starring role, and that you can still shine in a support position, but something about the logic is incomplete, and I can't quite put my finger on it. Stupid high school drama teachers and their cliches. To the point, in carpentry, there are no small cuts. Every cut is important and if you become imprecise somewhere, the error will carry throughout your project and can only get bigger and worse. So make your cuts the right way every time and you'll keep building on a great base. Case in point...

I need to cover the water pump, the Whisper King will not be whispering to me at night, or he will get thrown out the window while doing 8o on the highway. So I need to muffle his already quiet murmuring by building a pretty little box around the fresh water tank.


The problem is that when I build the box above the water pump and water tank, the top of that box will be above the base of the booth, where the booth cushions rest and then the cushions sort of bow upwards and look stupid. This irritates me, so at the behest of my good friend Aggravation, I elevated the frame the booth cushions rest upon to the height of the top of the box I will build over the water tank and pump. Small thankless task maybe, but now the booth isn't so high when we sit on the seats and also the carpentry in the front will be more appealing to the eye and the cushions won't bow out all stupid like they do.


Pretty simple really. Just wanted to document this one, since so many similar projects just get swallowed in the general plow-ahead-ness of the trailer restoration.


Opposite side of the water tank from the water pump. This is where the old water pump went. We'll call that one Old Rusty. Or Old Noisy. Or Old Sit In My Yard And Get Rained On.


Simply beautiful. 1"x2" lengths of poplar. I like working with poplar. It's very dense, strong, yet incredibly light.


And now you can see how the tops of the planks the booth cushions rest upon will be flush with the box that will rest upon the water tank and cover the water pump. A good two hours devoted to unbowing a cushion and/or making more appealing lines to the eye.


It's pennies that add up to dollars. Or some other cliche like that. I cannot think of one as cheesy as the one I learned in high school. Why can't I forget stuff like that instead of forgetting the stuff I was supposed to learn?

Sharkbite 101


We all know and hate these things right? Tire spikes. They allow you to go only one direction without penalty. Sharkbite plumbing fittings use the same premise to lock in polyethylene PEX plumbing pipe in place. It makes for a very easy plumbing task. Or so I was led to believe.


Do you see all the water on the floor underneath my kitchen sink? Yes, you can still make mistakes even when the tasks are easy. But what did I do wrong? The following pictures will serve as a quick nuts-and-bolts description of how a Sharkbite PEX fitting operates.


I felt like Wiley Coyote trying to catch the roadrunner when I saw who makes the PEX pipe. ACME? Really? That's a real business?

Keep the photo below in mind as we walk through the next few.


This is a classic demonstration of how to set up a permanent leak in a PEX fitting. See how the end of the pipe is jagged and doesn't sit flush with the T-fitting inside the pipe? Good. You have an excellent eye for detail.


That little T-fitting is shown in the photo above as a separate piece, between the gold Sharkbite T-connector on the right and the white PEX pipe in the middle. This little T-fitting (hollow) fits into the T-connector and is held in place by "tire spikes', as shown below.


The PEX pipe just shoves into the hole of the T-connector pipe fitting, metal on the outside, plastic on the inside. When shoved in as far as it can go (3/4"-ish) the end of your PEX pipe should rest flush against the T-fitting that we saw earlier. When the PEX pipe is shoved into the fitting all the way, it pushes this interior T-fitting against the metal interior of the fitting and is held in place, watertight, by the "tire spikes". If this flushness is not achieved, either you have an unorthogonal cut or your have burrs from the cut still on the pipe, or you are like me and had both, then the highly pressurized water can find its way out of the pipe and create an alternate definition for flush.


The T-fitting in the above photo is flush to the PEX pipe and illustrates what would normally happen inside the Sharkbite fitting. Want a closer look?


Shove it in. With as little regard as possible. Get roughneck with the pipe.


And now you're golden and probably dry. Here's a little snapshot of what last Sunday morning looked like for me while many were nursing their hangovers.


A little visit of encouragement always goes a long way. Notice the flat light and the way she's curled up in front of the heater? That's February in Oregon. The hardcore never give up on bare feet.


And just in case I was wrong, I used electrical splicing tape/friction tape/pressure tape/rubber tape/compression tape to wrap the joints thoroughly. I was NOT doing this over a second time.
("come back 'ere again and ah wheel taunt you a second time!")


And that's pretty much how you plug and play with Sharkbite and PEX. Screw the pipe to the floor or a wall where you can to alleviate pressure on the plastic pipe.

Until next time students, please continue to leap before you look. It's the only way to remember.

The Draw Bed Part Deux (Tetris Kickstands)

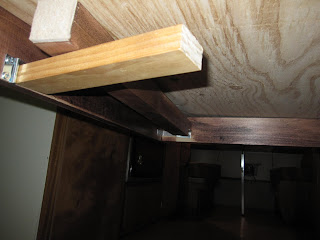
Check out this slick idea, courtesy of Brie. If you remember, we have a bed in a drawer. When we pull the bed out of the drawer it needs additional support, so we hinged legs to swing down under the corners. Well, we needed a way to keep the hinged legs up when we wanted to store them in the drawer. So... more hinges.


The new addition is the light piece. It's poplar, same as the dark piece, it's just unstained.


It swings to the side.


So the kickstand can slide out.


And then hinge down.


And support two very tired campers. The following photos are of the other side.


Hinged closed.


Swing to the side and release the kickstand.


Kickstand swings down.


And supports the bed corner. Pretty slick right? The cool thing is that it's very easy to do this blind. These photos are from the underside of the bed, but the bed is fairly low (like 18 inches high) so this makes it easy to reach down with one hand, feel for the hinge, swing it to the side and let the kickstand fall into place, supporting the bed frame. It folds up just as easily.

Thanks Brie! Great idea!

Below are two more shots of draw bed bling. The photo below shows the 1/4" plywood L-bracketed to the drawer-face of the draw bed, so that pulling the bed open won't bow the long drawer face out under duress. The L-bracket happens to be near one of the holes I drilled into the plywood to help alleviate any condensation issues from trapped moisture under the bed mattress (memory foam). Thes holes should help air circulate under us while we sleep.


And lastly, one of two draw bed locks. You must remember to secure everything in place like a boat when rebuilding the interior, since you never know what pitch, roll, or yaw the road might have. We couldn't have the draw bed sliding open on us during a sudden sharp turn. So now it won't. I actually forgot that I put these in place the other day and had a hell of a time trying to open the draw bed until I remembered these locks!